


How to create the perfect Facebook page for your business
 Facebook is the most used social media platform for marketers around the world. No matter what your marketing goals are, Facebook needs to be a part of your strategy.

It’s crucial to learn not only how to create a Facebook Business Page but also how to use it effectively to promote your brand. We’ve put together our guide for setting up and customizing a professional Facebook page and share our advice for how to use that page to grow your business by engaging with your Facebook audience.
Start with the basics
To create a Facebook Business Page, log in with your personal Facebook account and go to https://www.facebook.com/pages/creation/.
Once there, see two options: Business or Brand and Community or Public Figure. Click Get Started under Business or Brand.
Fill out your basic business info
After you select Business or Brand, you’ll be asked for a page name and category. Keep in mind that you can change your category later on, but your page name is forever. The category you choose will determine what other fields you’ll need to fill in.
Add a profile photo and cover photo
Social media image size standards are important — if you use the wrong size, you could end up with awkward cropping or pixelated images, so keep these recommended image sizes handy.
Facebook profile image size: 170 x 170 pixels
Facebook cover photo image size: 820 x 462 pixels
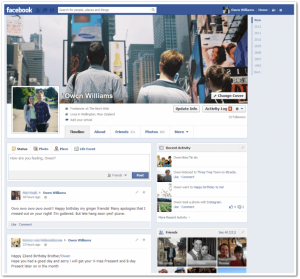
Your profile picture will appear as your icon every time your page’s content shows up in the Facebook News Feed and when you comment on other posts. Ideally, this will be your company logo. Square dimensions are best, but Facebook will crop the photo into a circle for ads and posts, so leave empty space around the edges. When you upload the image, you can preview the crop and make adjustments.
Cover photo – 820 x 462 pixels
Your Facebook cover photo appears across the top of your page and is a great opportunity to deliver a visual element that supports your branding, draws attention, or elicits emotion from your visitors.
According to Facebook, your cover photo is displayed at different sizes on desktops and smartphones — 820 pixels wide by 312 pixels tall on desktops and 640 pixels wide by 360 pixels tall on smartphones. In our experience, 820 pixels wide by 462 pixels tall seems to work best for both mobile and desktop. But make sure you keep important text and design elements in the center of the image and preview how the image will appear on mobile and desktop.
If you don’t have a designer on staff to help out with images, free tools such as Canva have pre-made templates that you can customize, or you can simply enter in the custom dimensions and create your own image. You can even upload a cover video or feature a slideshow of images.
Fill out your page information completely
Google indexes Facebook Business Pages, so the text you include on your profile can help you rank in global and local search engine results. When you create a Facebook Business Page, you’ll see tips that guide you through filling out all your page information. If you need to go back to make changes, go to your page’s About tab and click Edit Page Info.
Here are the fields to fill out:
- Username — Adding a username makes your page easier to find because the name appears in your URL (Facebook.com/YourUserName) instead of a string of randomly generated numbers.
- Description – Let people know what your page is about in 255 characters.
- Categories – Categories can help people find your page. Choose up to three categories.
- Contact information – If you have a business phone number, website, and email address, add them here.
- Location – If you have a physical store, share your address here. You can also include a service area.
- Hours – If you are only open during selected hours, state them here.
- More – Here you can add a list of your products, price range, and a link to your privacy policy.
All of these details will appear in the About section of your Facebook Page, where you can add even more information, such as your business’ story, awards, menu, etc.
Add collaborators to your page
If you plan on sharing your Facebook marketing duties with a team, you’ll want to grant access and assign roles to various folks. To add collaborators, go to your page settings and the Page Roles section. You can type in the name of any Facebook friend or person who has liked your page. Alternately, you can type in an email address associated with a Facebook account. Either way, you must be Facebook friends with anyone you add as a collaborator.
Role options include:
- Admin – Complete and total access to everything.
- Editor – Can edit the page, send messages, and post as the page, create Facebook Ads, see which admin created a post or comment, and view insights.
- Moderator – Can respond to and delete comments on the page, send messages as the page, see which admin created a post or comment, create ads, and view insights.
- Advertiser – Can see which admin created a post or comment, create ads, and view insights.
- Analyst – Can see which admin created a post or comment and view insights.
Learning how to create a Facebook Business Page is just the first step. Once you have your page, it’s crucial to be consistent with your content. You don’t want to spend all that time customizing your page and building up your following and then only post sporadically.
Related Posts
Instagram Implements Advanced Protections for Teen Users.

5 Skills to Become a Successful Social Media Marketer

LinkedIn Adds AI Training Opt-out Option

What Video Editing Software Do Youtubers Use in 2024?

How VoIP Services are changing the Way We Make Calls